


Hackers Assistant is a multitasking tool for windows. It has several useful features and is updated every time I learn something new (and if it's worth adding). The current version is Hackers Assistant 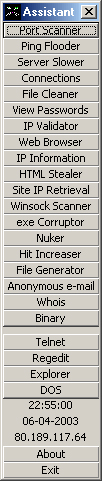 v1.2. Here is a list of the features: v1.2. Here is a list of the features:Port Scanner - Scan an IP for open ports Ping Flooder - Flood a connection with pings Server Slower - Slow down a small web server Connections - View a list of all current IP's and ports your computer is connected to File Cleaner - Browse your hd and delete unwanted files Get Passwords - Reveal some cached pass's on your computer* IP Validator - Just checks to see if an IP is valid* Web Browser - A simple web browser Ip Information - View your current IP HTML Stealer - Steal HTML from a web site Site IP Retrieval - Retrieves a web sites IP Winsock Scanner - Scans a program to see if it uses winsock.ocx exe Corruptor - Corrupts exe's so they can never be used again Nuker - Floods an open port with a specified amount of text Nuker 2 - Floods an open port with text continuously and auto-reconnects when connection is lost Hit Increaser - Increase's counters and votes File Generator - Generates a dummy file with a specified file size Anonymous e-mail - Send anonymous e-mails Whois - A very simple whois client Binary - A binary encoder and decoder. Also has tool tip texts for each button Also includes easy access to Telnet, Regedit, Explorer and DOS also time, date and I.P. are displayed at the bottom *Was not fully made by me Download Hackers Assistant v1.2 - 133kb When you run Hackers Assistant, do you get an error saying something about mswinsock.ocx, then don't worry. Goto http://www.blueleafsoftware.vze.com then go to the downloads section and download Auto-Winsock Register, extract it, run the exe then Hackers Assistant should work! | |
Sunday, December 25, 2011
Friday, December 23, 2011
Anonymous Browsing via Proxy Servers with Proxy Switcher
A Hacker needs to hide his IP address by using free IP Changer software while doing any sort of hacking stuff. This is particularly necessary when you’re trying to DDOS or Deface a website. Website Hacking requires complete anonymity so that it becomes hard to trace the hacker. So, I am here to inform you about Proxy switcher Standard – a software used to hide your IP Address. It is a free IP Changer software available for 15 days as free trial. So, download Proxy Switcher Standard to hide your IP address. I have provided link for this software download… just read on.
Proxy Switcher Standard – Free IP Changer:
Proxy Switcher is one of the best proxy software's ever made and it is a perfect free IP Changer tool. This software automatically downloads and tests all proxy servers. So, you don’t need to search for any “free proxy list” on Google. This software can also automatically change your IP address every 5 minutes or so (available in Pro version) which makes it really useful.
Steps to use Free IP Changer:
1. Free download Proxy Switcher Standard to hide your IP address.
Password: techotoys.blogspot.com
2. Go to Whatismyip.com and check your IP address.
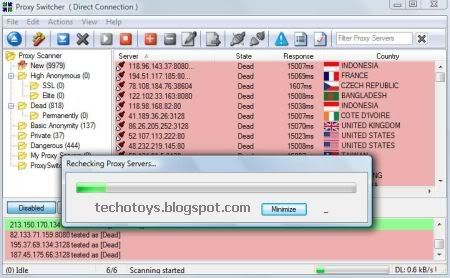
3. Run and install this Free IP Changer software on your computer. Proxy Switcher will automatically start downloading and testing for “Live Proxy servers” as shown.
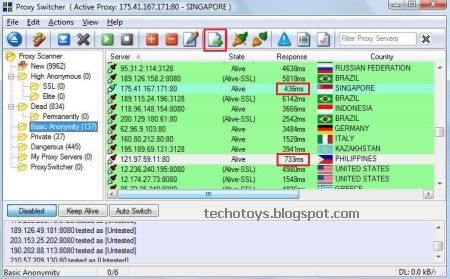
4. After it has tested all proxy servers, hit on “Basic Anonymity”. Here, you will get a list of all working “Alive Proxy servers”. Looking at the response time, choose 4-5 proxy servers (or even more, if required) with lowest Response Time and move these proxy servers to “Proxy Switcher” folder. You can use the highlighted button in top bar to move these proxy servers.
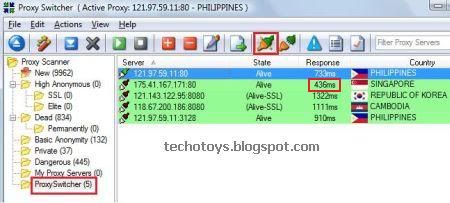
5. In Proxy Switcher folder, select the proxy server with minimum response time and hit on button highlighted in below image. Proxy Switcher will start using this Proxy server as your IP address.
Now, go to Whatismyip.com and check your IP address. You will find it different from Step 1. Thus, this Free IP Changer software has done the job for you.
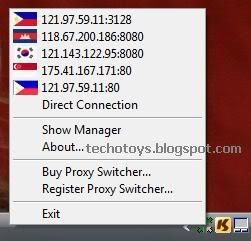
Also, whenever you wish to change your IP Address, simply right click on Proxy Switcher icon in task bar and select any proxy server you want.
Configuring Firefox to use Proxy Switcher:
If you’re using Firefox, you need to configure Firefox to use proxy server from this Free IP changer software.
6. After completing Step 5, open you Firefox. Go to Tools ->Options. Hit on Advanced ->Network Tab and then Settings to get this:

7. Enter, the information as below:
HTTP Proxy: localhost
Port: 3128
as shown in image.
Hit on OK. Now, Firefox will start using proxy server specified by Proxy Switcher software.
Thus, you are successful in hiding your Ip Address using this Free IP changer software. There are many such free IP Changer software's available on web. I’ll be reviewing best of them in my coming articles.
Got stuck in setting up Proxy Switcher software??? No probs, simply share your reactions in comments. I am always there to help you.
Enjoy free IP Changer software to hide your IP address…
Note: The article is meant for educational purpose only. I am not responsible for any act done by you. Remember, hacking website is legally offensive and can take you behind the bars.
Hack Website using DOS attack:
A DOS (Denial Of Service ) attack is implemented by sending large number of requests to a web server . Due to large requests, web server clogs up and is unable to respond to other requests. Excess packet traffic in the network leads to congestion and consequently, the web server shuts down, restarts or at least is unable to serve other clients. Thus, it appears that the website it down. And we are able to temporarily hack website using DOS attack.
How to use LOIC to hack Website???
1. Free download Low Orbit Ion Cannon software to hack website.
Password: techotoys.blogspot.com
2. Run LOIC.exe file on your computer to see:

3. Now, enter the target website url which you want to hack and hit on Lock On.
4. In Attack Options, assign “9001″ as timeout value. Enter any number of threads you want LOIC to use. The number of threads refers to the number of virtual computers, LOIC will try to imitate.
5. Now, hit on “IMMA CHARGIN MAH LAZER” so that LOIC starts DOS attack on the website.
Note: A single instance of this software doesn’t take a website down. If you really want to hack website using LOIC, run multiple instances of LOIC on multiple computers and DOS the website using these hundreds of LOIC instances. Then, you have hope of taking down a website.
So guys, this was all about how to hack website using DOS attack and LOIC. As you might have seen, you can hack website if you are running multiple instances of LOIC. If you have any problem in this tutorial to hack website using LOIC, please mention it in comments.
Enjoy LOIC to hack website using DOS attack…
IP Hack – How to find someones IP Address:
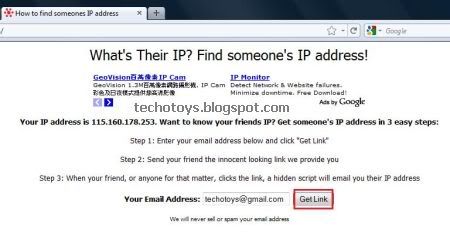
1. Go to IP Address Finder website to find someone’s IP Address.
2. Enter your email id where you want to receive the victim’s IP Address and hit on Get Link.
3. Now, you will get a link from IP Address Finder.
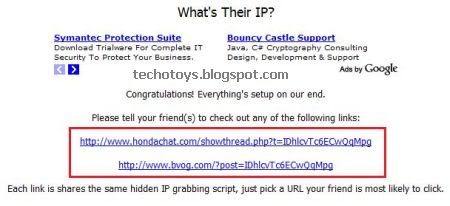
4. Send this link to your victim and whenever he will simply click on this sent link, his IP Address will be recorded and mailed to you by IP Address Finder.
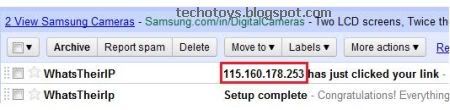
Thus, this is so simple. You can easily find someone’s IP Address using this IP Address Finder tool.
So far, this is the simplest method used to find someone’s IP Address. This IP hack doesn’t require any technical knowledge nor any skills
Why surf anonymously?
Everyone is curious by nature. Everyone likes gossiping about others and swapping news. But no one would really like to be secretly spied on. That's why we close doors whenever we want to be left undisturbed or chat on the phone with friends without anyone listening in.

There is little privacy on the Internet. Website operators would like to know what you're interested in. Businesses want to know what you're up to on the Internet. Public authorities, secret services etc. want to know as much as they can about their citizens. It's time for you to protect yourself and your privacy!
Would you like to be told by your bank some time in the future: ”Your Internet transactions are subject to a credit limit.“? You are fully entitled to decide yourself to whom you wish to provide which information about yourself and your actions.
You leave behind a load of trails when you surf on the Internet, but not only on your PC. Each access provider knows exactly when you visited which websites. Many websites save your address and the details of what you looked at.
However, you certainly wouldn't like it if your neighbor knew which magazines you read and what you buy and where.
Never forget: your computer's unique IP address can provide such details as your name, address, age, telephone number and more.
What information do we leave behind?
Any time anyone visits a web server, they always unwittingly leave behind their IP address as an indication of their visit. It is also specified exactly in the server logs which content was transferred to this IP address, which content was downloaded and where on the website which link was clicked. The website is also often informed as to where you have come from.
CyberGhost VPN at your service!
CyberGhost is an important tool for protecting your privacy. CyberGhost VPN replaces the externally visible IP address, which users have received from their provider when they dial up to connect to the Internet, with a CyberGhost VPN IP address. The CyberGhost user shares this IP address with a number of other users. This procedure ensures that the CyberGhost VPN IP address should not be assigned to one particular CyberGhost VPN user.
Communication between the CyberGhost VPN user's computer and the anonymization servers is also particularly well protected to prevent any eavesdropping on data transfers. This protection is set up in 2 steps when establishing the connection. 1024-bit SSL encryption is used when establishing the connection. In this case, a 128-bit AES key is negotiated, which is unique for each connection. The actual communication takes place via this AES key.
Easy to use
The procedure involved sounds very complicated, but we have actually made it very simple. Take the following few steps to make yourself anonymous:
- Download and install the software
- Start the software
- Create an account if you are using the software for the first time
- Log in to the CyberGhost VPN system
- Connect to the service you want
- DONE... you're now surfing anonymously.
<<<<<<<<<<FOR DETAILS>>>>>>>>>
Get Gmail account creation Date:

1. Gmail Welcome Mail :
All Gmail accounts receive “Gmail Welcome Mail” after they create their Gmail account. So, this “Welcome Mail” has the same date as your Gmail account creation date. So, noting this date will serve the purpose. Go to Gmail inbox and hit on Oldest button to get the last message. This message will be from Gmail Team. Note this mail’s date. Done!!!
But, many readers said that they have deleted Welcome mail and so are unable to get the account creation date. If you are one of them, proceed to the second point.
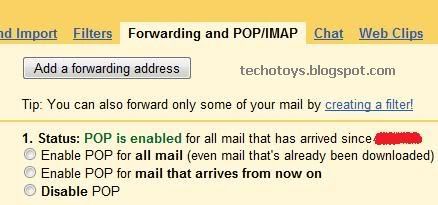
2. Using POP:
Well, this method will work for accounts created after 2007.
Go to Settings -> Forwarding and POP/IMAP and under POP Download, look for :
1. Status: POP is enabled for all mail that has arrived since “Your Account Creation Date”
and you will get the required date as shown in image below:
So friends, these are the two tricks to get your Gmail account creation date. Keep a safe note of this date as it can be pretty useful for you in future. If you have any problem in this article on how to get Gmail account creation date, please mention it in comments.
How to Autorun USB programs using Autorun.inf:
First of all, let us consider a simple situation. What happens when you plug-in USB drive to your computer??? Windows will show you a prompt box. This box is called Autoplay dialog box. On hitting OK, you will be shown the contents of this USB drive.

What we want??? To make certain files (our keylogger server, to be exact) to autorun once USB drive is plugged to computer, without any action from victim’s side. Well, I am sorry to tell you, but as far as I know, this is not possible in Windows XP, Vista and Windows 7. Disappointing??? Yes, absolutely. Then why the hell, I am writing this article??? Let me tell you. In this article, we will try our best to make sure that victim unknowingly autoruns our keylogger server. So, lets start.
Autorun.inf USB hack:
1. Open a notepad file and type the following:
[autorun]
open=server.exe
action=Run server Program
icon=server.exe
label=My Portable PC
Replace “server” with your server name everywhere in the code.
2. Save this notepad file as “autorun.inf” (without quotes).
If you are unable to create the file, download Autorun.inf USB file here.
Password: techotoys.net
3. Now, put this file into the root of your USB drive. By root, I mean the default USB folder i.e. say my USB Drive is I: , then
I:\autorun.inf
is my autorun file path. Make sure you get this correct.
4. You’ve almost completed the autorun USB hack. Now, safely remove the USB flash drive and plug-in to your victim computer. He will be shown USB dialog box like this:

5. On hitting OK, Windows will autorun USB program, in this case, the server.exe file will start running automatically. Alternately, if you open My Computer, and try to open USB drive by double clicking on it, the server.exe will install itself automatically.

So, the victim doesn’t need to open any sort of file. Whenever he will try to open the USB drive, the autorun.inf USB hack will do its work.
Note: This autorun.inf USB hack has been fixed in Windows 7 and will not work. Also, as far as I know, it is not possible to autorun USB programs on Windows and you can’t bypass the USB dialog prompt. Usually, the program that occupies first position in USB dialog box is run after hitting on OK. So, we will make sure that our server.exe occupies first position in dialog prompt.
Also, you can customize the above code to match your needs. Keep them coming in comments section.
Drawback of Autorun.inf USB hack:
Some of the antiviruses do not allow Autorun.inf file to start automatically and alert the victim of its existence. So, this Autorun.inf USB hack might not work, if AVs play their role.
This was all about the way to autorun USB programs on Windows using Autorun.inf USB file. As you might have noticed, the hack depends a lot on Social Engineering for its success. If you have faced any problem while implementing this autorun.inf USB hack, please mention it in comments.
Enjoy Autorun.inf file hack to auto run USB programs…
Introduction

True Crypt is a software system for establishing and maintaining an on-the-fly-encrypted volume (data storage device). On-the-fly encryption means that data is automatically encrypted right before it is saved and decrypted right after it is loaded, without any user intervention. No data stored on an encrypted volume can be read (decrypted) without using the correct password/key file(s) or correct encryption keys. Entire file system is encrypted (e.g., file names, folder names, contents of every file, free space, meta data, etc).
Files can be copied to and from a mounted True Crypt volume just like they are copied to/from any normal disk (for example, by simple drag-and-drop operations). Files are automatically being decrypted on the fly (in memory/RAM) while they are being read or copied from an encrypted True Crypt volume. Similarly, files that are being written or copied to the True Crypt volume are automatically being encrypted on the fly (right before they are written to the disk) in RAM. Note that this does not mean that the whole file that is to be encrypted/decrypted must be stored in RAM before it can be encrypted/decrypted. There are no extra memory (RAM) requirements for True Crypt. For an illustration of how this is accomplished, see the following paragraph.
Let's suppose that there is an .avi video file stored on a True Crypt volume (therefore, the video file is entirely encrypted). The user provides the correct password (and/or key file) and mounts (opens) the True Crypt volume. When the user double clicks the icon of the video file, the operating system launches the application associated with the file type – typically a media player. The media player then begins loading a small initial portion of the video file from the True Crypt-encrypted volume to RAM (memory) in order to play it. While the portion is being loaded, True Crypt is automatically decrypting it (in RAM). The decrypted portion of the video (stored in RAM) is then played by the media player. While this portion is being played, the media player begins loading another small portion of the video file from the True Crypt-encrypted volume to RAM (memory) and the process repeats. This process is called on-the-fly encryption/decryption and it works for all file types (not only for video files).
Note that True Crypt never saves any decrypted data to a disk – it only stores them temporarily in RAM (memory). Even when the volume is mounted, data stored in the volume is still encrypted. When you restart Windows or turn off your computer, the volume will be dismounted and files stored in it will be inaccessible (and encrypted). Even when power supply is suddenly interrupted (without proper system shut down), files stored in the volume are inaccessible (and encrypted). To make them accessible again, you have to mount the volume (and provide the correct password and/or key file).
<<<<<<<<<<<DOWNLOAD>>>>>>>>>>
Tuesday, December 13, 2011
Internet Download Manager

(IDM) is a tool to increase download speeds by up to 5 times, resume and schedule downloads. Comprehensive error recovery and resume capability will restart broken or interrupted downloads due to lost connections, network problems, computer shutdowns, or unexpected power outages. Simple graphic user interface makes IDM user friendly and easy to use.Internet Download Manager has a smart download logic accelerator that features intelligent dynamic file segmentation and safe multipart downloading technology to accelerate your downloads. Unlike other download managers and accelerators Internet Download Manager segments downloaded files dynamically during download process and reuses available connections without additional connect and login stages to achieve best acceleration performance.
<<<<<<<<<<DOWNLOAD IDM6.08 beta HERE>>>>>>>>>>
Thursday, November 24, 2011
A safe journey online begins with a single encrypted keystroke
KeyScrambler
Protects your secrets from keyloggers & keylogging malware attacking your computer.
- The advanced key-encryption method keeps your keystrokes scrambled and indecipherable while they travel from your keyboard to the destination app.
- The encryption of your keystroke stream is displayed realtime in the unobtrusive user interface so you know how and when KeyScrambler is working.
No user effort + Peace of mind
The Crucial Path in the Operating SystemWhen you try do something online, for example access your checking account on your bank's website, your keystrokes will travel along a path in the operating system to reach the destination application. Many places along this path, malware can be physically or remotely planted by cyber criminals to intercept your keystrokes so they can steal your user name and password, which is why keystroke logging (keylogging) poses such a serious threat and is a thorny problem to solve.KeyScrambler secures your keystroke data through the crucial path. How does it work?
| ![[howitworks_v.gif]](http://www.qfxsoftware.com/uploads/images/howitworks_v.gif "[howitworks_v.gif]") |
![[howitworks_h.gif]](http://www.qfxsoftware.com/uploads/images/howitworks_h.gif "[howitworks_h.gif]") |
KeyScrambler Features
Innovative User Interface Provides Transparency.

You're typing away on your computer. KeyScrambler's scrambling every of your keystrokes at the same time. And the process is reflected, like in a mirror, in the KeyScrambler's user interface, an unobtrusive green overlay window that appears in one of the corners of your computer screen. This is one of the most appealing innovations of KeyScrambler to our users: it keeps them in control and gives them peace of mind
Smart Engineering Keeps Ahead of the Bad Guys.
By encrypting realtime the user's keyboard entries in the kernel and decrypting them in the destination app, KeyScrambler adds an effective layer of defense to traditional anti-virus, anti-malware programs, whose detect-and-remove method often fails in dealing with new, unknown malware attacks. With its unique preventive approach and innovative use of state-of-the-art cryptography, KeyScrambler protects your keystroke data even on computers infected by keylogging malware, and defeats both known and unknown keyloggers.
Wednesday, November 2, 2011
How to Hide Data in Image, Audio & Video Files: Steganography

Ever wondered to know how to hide secret messages in images, audio and video files? Well, in this post I will take you through a concept called steganography using which, it is possible to hide your secret information in image files, songs or any other file of your choice. At the end of this post, you can also download free stegnographic tools and start hiding your data.
What is Steganography?
Steganography is a means of obscuring data where secret messages are hidden inside computer files such as images, sound files, videos and even executable files so that, no one except the sender and the receiver will suspect the existence of stealth information in it. Steganography may also involve the usage of cryptography where the message is first encrypted before it is concealed in another file. Generally, the messages appear to be something else such as an image, sound or video so that the transfer of secret data remains unsuspected.
How to Use Stego Magic?
Suppose you want to hide a text message inside a JPG file:
1. Place the JPG and the text file (.txt) in the same folder as that of StegoMagic_TXT.exe
2. Run StegoMagic_TXT.exe and follow the screen instructions to embed the text message inside the JPG image.
3. Note down the secret decryption key.
Now you can send this image to your friend via email. To decrypt the hidden message, your friend should load this JPG file onto the Stego Magic tool and use the secret decryption key.
<<<<<<<<<<DOWNLOAD HERE>>>>>>>>>>>>
Friday, October 14, 2011

How to share Internet connection from pc to a Symbian or java mobile using Bluetooth
Step 1
First create a new access point:
Example
Connection Name > Hiisi (Or anything else you want)
Give a valid Access Point Name (you can take it from any valid GPRS/EDGE connection)
Leave everything on default then go to Options > Advanced settings.
On the proxy server address enter 127.0.0.1 and 1234 as the proxy port number. Now save the new access point.
Step 2
Installation on the phone
On the folder that you extracted \Hiisi1.6.3\Hiisi\bin there are Hiisi.jar and Hiisi.jad.
Copy both files to the root of your MMC or phone memory, its important that both files are in the same directory for proper installation.
Then using any file explorer, locate and run the hiisi.jad file and not the JAR, this will be in a path looking something like E:/hiisi.jad (it is important to run the jad file, and NOT the jar file, or simply won't work at all, but .jar file must also be present in same dir as the .jad file for successful installation), so follow all on screen prompts which comes from after clicking the hiisi.jad file, and go ahead and install it.
Step 3
Configuring the server on PC
First we need to know the COM port used by your Bluetooth.
In my case its COM11. In the main panel of BlueSoleil go to My Services > Properties > Serial Port A.
Now we need to edit the COM Port in the Pihatonttu.cmd.
Open Notepad and drag and drop Pihatonttu.cmd inside the Notepad.
Example
Ctrl+S to save it and close Notepad. Now double click the Pihatonttu.cmd and the Pihatonttu Proxy window will appear.
Note: If you get error like "COM Port is in use" when you launch the app, close it and launch again.
Step 4
Now launch the Hiisi Proxy on your Phone. It will ask you "Allow application Hiisi bla bla bla...?" Press Yes.
Select and press Bluetooth Mode then it will say "Inquiring bluetooth devices..."
Now choose your PC bluetooth name then it will search for bluetooth serial port.
On the next screen you will see the btspp://..... selection.This is the RFCOMM service and you need to select this one. (select the first and not the second)
Final step
Now without exiting the Hiisi Proxy, unlike GnuBox, open the browser on the phone and try to open any web page.
When prompted which access point to use, select your new dummy access point. In my case I called it 'Hiisi' so I have to select that.
That's it. Done. Now you can browse using the PC Broadband on Mobile. No more GPRS/EDGE charges.
Click here to download
Copy to clipboard
Name the access point anything you wish. In my case I called it 'Hiisi', but you name it as you want.Code:
Go to - Tools > Settings > Connection > Access points > Options > Create new access pointExample
Connection Name > Hiisi (Or anything else you want)
Give a valid Access Point Name (you can take it from any valid GPRS/EDGE connection)
Leave everything on default then go to Options > Advanced settings.
On the proxy server address enter 127.0.0.1 and 1234 as the proxy port number. Now save the new access point.
Step 2
Installation on the phone
On the folder that you extracted \Hiisi1.6.3\Hiisi\bin there are Hiisi.jar and Hiisi.jad.
Copy both files to the root of your MMC or phone memory, its important that both files are in the same directory for proper installation.
Then using any file explorer, locate and run the hiisi.jad file and not the JAR, this will be in a path looking something like E:/hiisi.jad (it is important to run the jad file, and NOT the jar file, or simply won't work at all, but .jar file must also be present in same dir as the .jad file for successful installation), so follow all on screen prompts which comes from after clicking the hiisi.jad file, and go ahead and install it.
Step 3
Configuring the server on PC
First we need to know the COM port used by your Bluetooth.
In my case its COM11. In the main panel of BlueSoleil go to My Services > Properties > Serial Port A.
Now we need to edit the COM Port in the Pihatonttu.cmd.
Open Notepad and drag and drop Pihatonttu.cmd inside the Notepad.
Copy to clipboard
In the COM7, change the number 7 to your COM Port used by bluetooth. In my case is COM11 so it should be like this:Code:
start javaw -Djava.library.path=. -cp .\lib\comm.jar;.\lib\jdic.jar;.\class Pihatonttu.PihatonttuMain COM7 nullCopy to clipboard
If you want to use 3rd party proxy server just replace null with 200.65.127.161:3128 (note that this proxy is only for example, you're not supposed to use this) or any other proxy you want.Code:
start javaw -Djava.library.path=. -cp .\lib\comm.jar;.\lib\jdic.jar;.\class Pihatonttu.PihatonttuMain COM11 nullExample
Copy to clipboard
Note: You can do the same with the Pihatonttu_localhost.cmd file but in my case it worked with Pihatonttu.cmd.Code:
start javaw -Djava.library.path=. -cp .\lib\comm.jar;.\lib\jdic.jar;.\class Pihatonttu.PihatonttuMain COM11 200.65.127.161:3128Ctrl+S to save it and close Notepad. Now double click the Pihatonttu.cmd and the Pihatonttu Proxy window will appear.
Note: If you get error like "COM Port is in use" when you launch the app, close it and launch again.
Step 4
Now launch the Hiisi Proxy on your Phone. It will ask you "Allow application Hiisi bla bla bla...?" Press Yes.
Select and press Bluetooth Mode then it will say "Inquiring bluetooth devices..."
Now choose your PC bluetooth name then it will search for bluetooth serial port.
On the next screen you will see the btspp://..... selection.This is the RFCOMM service and you need to select this one. (select the first and not the second)
Final step
Now without exiting the Hiisi Proxy, unlike GnuBox, open the browser on the phone and try to open any web page.
When prompted which access point to use, select your new dummy access point. In my case I called it 'Hiisi' so I have to select that.
That's it. Done. Now you can browse using the PC Broadband on Mobile. No more GPRS/EDGE charges.
Click here to download
Subscribe to:
Comments (Atom)


